In this article, you will understand step by step how to easily integrate with Jira
Permissions For Jira Issue Tracking Integrations
Permissions for API actions are inherited from the creator of the key. The permissions scope are:
read:jira-workread:jira-userread:permission:jira
Prerequisites For Jira Issue Tracking Integrations
The user creating an API token needs Jira Administrator permissions to access workflow data. The Org Admin, who is the default owner in your organization, or a user with Product admin permissions can create the token. You can assign these permissions as needed.
- Navigate to the users directory in Atlassian Administration and select the user you want to assign the role to.
-png.png?width=500&height=260&name=Untitled%20(32)-png.png)
- Click on Grant access.
-png-1.png?width=500&height=285&name=Untitled%20(32)-png-1.png)
- Select Product admin under Jira Administration, and then click Grant access.
-png.png?width=500&height=240&name=Untitled%20(33)-png.png)
-png.png?width=400&height=237&name=Untitled%20(21)-png.png)
-
- Go to Edit menu of the workflow
- Click on the transition to resolution status and on the Post Functions
-png.png?width=621&height=175&name=Untitled%20(34)-png.png)
-png.png?width=625&height=256&name=Untitled%20(35)-png.png)
-
- Make sure the Resolution is set to a proper value when issue is being moved to resolution status
-png.png?width=610&height=306&name=Untitled%20(36)-png.png)
How to Connect Scytale and Jira Issue Tracking
-
In Scytale, go to 'Integrations'.

-
Search for Jira Issue Tracking and select 'Connect'.

-
Fill in the following fields:
• API Token – Paste the token you generated (see steps below).
• Domain URL – This is your Jira base domain (e.g. https://scytalemodel.atlassian.net).
• Email – The email of the Jira user who generated the token.
-
Add a connection name – this will be used to differentiate between your connections – and then select 'Next'.
-
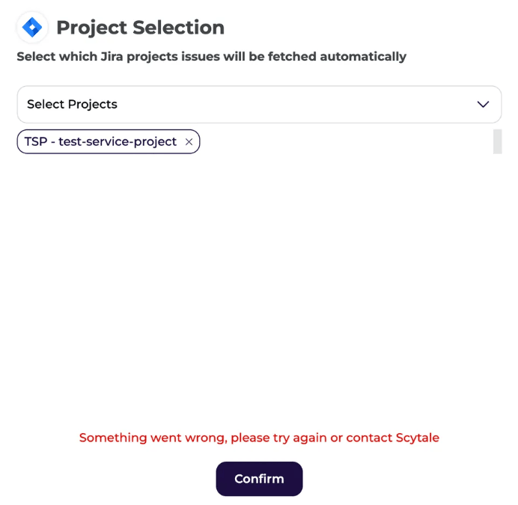
Select the Jira projects relevant to your audit and select 'Confirm'.
-png.png?width=335&height=336&name=Untitled%20(26)-png.png)
Note: If no projects are selected, the connection will not be completed, and evidence cannot be collected.
-png.png?width=600&height=333&name=Untitled%20(22)-png.png)
3. Enter token name and click “Create”
-png.png?width=500&height=380&name=Untitled%20(23)-png.png)
4. Copy the token and save it in a notepad for safekeeping
-png.png?width=500&height=325&name=Untitled%20(25)-png.png)
Troubleshooting
1.) Resolving "No Done Status Defined" Error
While connecting you may get such error:
”We could not find any status in Done resolution defined for tickets in certain projects. Please address this in Jira settings before proceeding.”
Steps to resolve:
- In Jira, go to Projects → Workflows → diagram


- Make sure at least one 'Done' status is defined in at least one of your workflows. In the diagram, it should be marked with a green color. Add a 'Done' status if one is not already defined.
-png-1.png?width=468&height=277&name=Untitled%20(30)-png-1.png)
2.) Data Collection Issues After Successful Connection
- If you have an issue, data not being collected, after a successful connection, you can test the connection within the Scytale application.
- This test may help identify the cause of the issue, such as the absence of resolved tickets in your project(s).
- Select 'Test connection'.

3.) Project Selection Errors Caused by Permission Schemes
- If you receive an error after selecting projects, it may be caused by a custom permission scheme configured for those projects, restricting our access.

Steps to solve:
-
As an administrator, go to Jira, click the Settings icon in the top right corner, and select 'Issues'.

-
In the left-hand sidebar, select 'Permission Schemes'.

-
Find the permission scheme assigned to the problematic project.
- Open the scheme, find the 'Browse Projects' permission, and click 'Update'.

- In the dialog that appears, select 'Single user', and choose the user account used to connect to the Scytale platform. Click 'Update' to save the changes.


