In this article, you will understand step by step how to easily integrate with Microsoft Entra ID
Microsoft 365 and Microsoft Entra ID users can connect using Azure AD
Integrating with Microsoft Entra ID and Microsoft 365 will allow Scytale to collect relevant user access information and their access privilege rights on Microsoft. This will help to inspect and ensure that only authorized users have access to Microsoft - which is one of the key criteria when testing logical access. Manually collecting this type of evidence can take some time, especially when you need to prove to the auditors that the user listings are complete and accurate, and when you have a long list of users that require multiple pieces of evidence to be provided.
Automating the collection of user listings and access privileges streamlines the sampling process for the audit, and also provides assurance over the accuracy and completeness of the evidence collected.
Permissions for Microsoft Entra ID Integration
All permissions requested are read-only and used exclusively to collect evidence for audit purposes. Scytale does not perform any actions or changes within your Azure AD account.
Required permissions:
-
User.Read.All -
RoleManagement.Read.Directory -
GroupMember.Read.All -
Group.Read.All -
Directory.Read.All -
Application.Read.All -
UserAuthenticationMethod.Read -
Reports.Read.All -
Policy.Read.All
How to Connect Scytale and Microsoft Entra ID
-
In Scytale, go to 'Integrations'.

-
Search for Microsoft Entra ID and select 'Connect'.

-
Paste the following details from your Azure application:
• Application ID
• Secret Value
• Directory IDLearn how to create these credentials below

-
Add a connection name – this will be used to differentiate between your connections – and then select 'Next'.
-
Click 'Connect' to complete the setup.
You have now successfully connected to Microsoft Entra ID!
How To Create Credentials in Micorsoft Entra ID
💡Global admin role should create the application.
Step 1: Register an application
-
Log in to the Azure portal and then navigate to Microsoft Entra ID.
-
On the left menu, click on App registrations
-
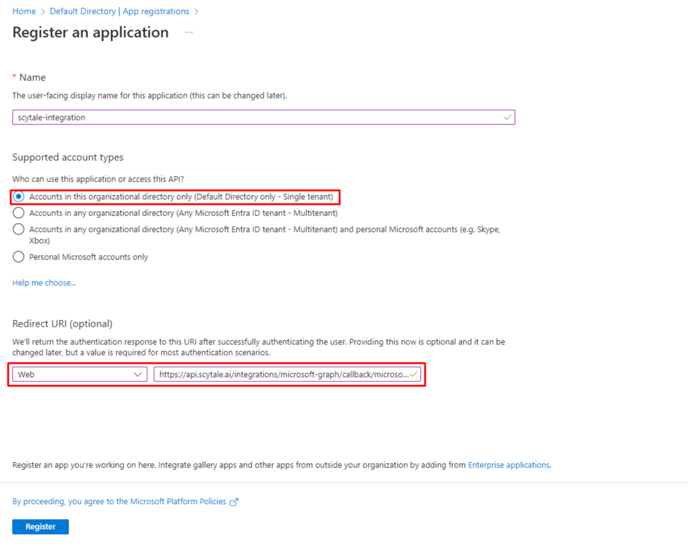
On the screen that loads, click on New registration and fill in the following details:
-
Name - you can choose a name, for example: scytale-integration
-
Supported account types - the first option must be selected - "Accounts in this organizational directory only (Default Directory only - Single tenant)".
-
Redirect URI - select Web from the drop-down menu, and in the text box paste the following:
https://api.scytale.ai/integrations/microsoft-graph/callback/microsoft-graph -
Click on Register
-
-
Next, navigate to the app registrations page.
-
On the app registrations page, click on scytale-integration (the application you just created in the previous step).
-
On the left menu, select "overview".
-
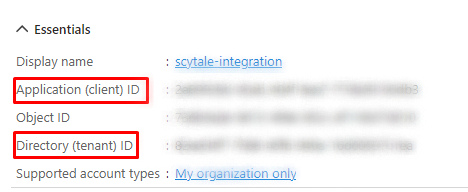
Under "Essentials", copy the (A) - Application (Client) ID and the (B) - Directory (tenant) ID (You'll need this to connect the integration)
Step 2: Create a new client secret for the app
-
Make sure you are still within the scytale-integration app, created in step 1.
-
Go to "Certificates & secrets", in the left menu.
-
Click on New client secret.
-
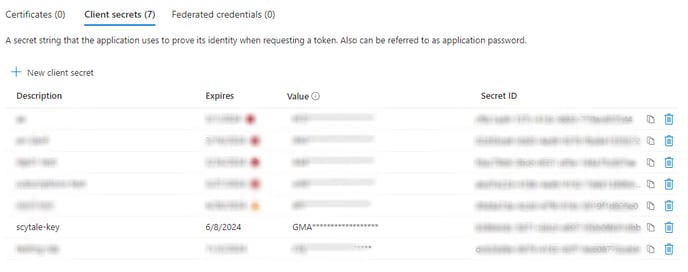
Description - you can choose a description, for example: scytale-key
-
Expires - we recommend selecting 730 days (24 months). As we cannot collect data after the key expires.
-
Click on Add.

-
-
Click on the copy sign on the (C) - "Value" column. (You'll need this to connect the integration)
Step 3: Add permissions
-
Make sure you are still within the scytale-integration app, created in step 1.
-
Go to "API permissions"
-
Click on Add a permission
-
Under "Request API permissions"
-
In Microsoft API's tab, select "Microsoft Graph" and then select select "application permissions".
-
Select to add the following permissions (you can search for permissions from the list):
-
User.Read.All
-
RoleManagement.Read.Directory
-
GroupMember.Read.All
-
Group.Read.All
-
Directory.Read.All
-
Application.Read.All
-
UserAuthenticationMethod.Read
-
Reports.Read.All
- Policy.Read.All
- User.Read.All
- Group.Read.All
- RoleManagement.Read.Directory
-

-
-
Click on Add permissions
-
Under API permissions - to grant permission, select "Grant admin consent for Default Directory".
